
Astro v2で導入された Content Collections の移行手順まとめ
目次
先日、Astro@2 がリリースされ、多くの機能が追加されました。
- Content Collections:
src/contentが予約ディレクトリとなった- Markdown/MDX に型が付き、安全になった
- Hybrid Rendering: 静的レンダリングと動的レンダリングを複合できるようになった
- エラー画面が読みやすくなった
- Hot Module Reloading (HMR) が改善された
- Vite@4 へ上がった
詳しくは以下の記事を読んでください。今回は、Content Collections について紹介していこうかなと思います。Hybrid Rendering は次回やるかも。
Astro 2.0 | Astro
Astro 2.0 is here! Astro 2.0 is the first major web framework to deliver complete type-safety for Markdown and MDX. Other release highlights include: Hybrid Rendering • Redesigned Error Overlays • Improved Dev Server and HMR • Vite 4.0 • A New Public Roadmap

今回話す Astro@1 のpagesからcontentへの移行の詳しいコードは以下の PR を見てください。
refactor: migrate to Content Collections by hiroppy · Pull Request #549 · hiroppy/site
https://docs.astro.build/en/guides/content-collections
Content Collections とは?
Content collections
Manage your content with type safety.

Markdown/MDX を保存するコンテンツ用の予約されたディレクトリです。その中で以下のように、blog や newsletter などカテゴリーを分けます。
src/content/├── blog│ ├── astro-client-env.mdx│ ├── astro-content-collection.mdx│ └── astro-script-issue.mdx└── config.tsこの Content ディレクトリに置くことにより、frontmatter や Markdown の API の型を強化することができます。
1
pagesにある Markdown/MDX をsrc/content/xxxへ移動させる
コレクションを定義する
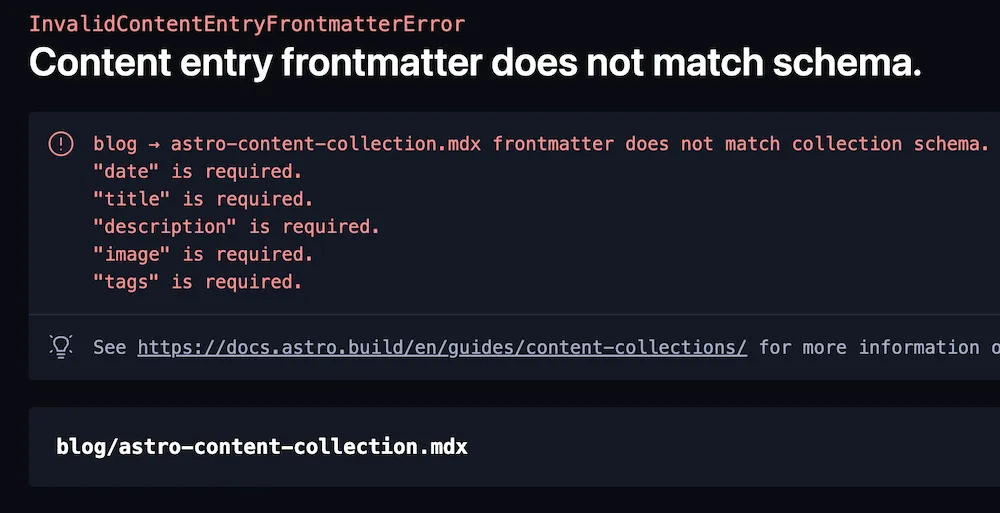
それぞれのカテゴリーのことを Collection と言います。src/contentの配下にconfig.tsを作成し、 zod を使い frontmatter を定義する必要があります。
import { defineCollection, z } from "astro:content";
const blogCollection = defineCollection({ schema: z.object({ date: z.date(), title: z.string(), description: z.string(), image: z.string(), tags: z.array(z.string()), }),});
export const collections = <const>{ blog: blogCollection,};この定義によって frontmatter に対して型検査を行うことができるようになりました。
2
config.tsを作成し、Markdown/MDX に使われている frontmatter を定義する
.astro ディレクトリを ignore する
この機能を使うと、config.ts から型が生成されこの.astroディレクトリが作られるため、 git, prettier, eslint に無視するように ignore ファイルに追加します。
またエディタの TypeScript がastro:contentを import した時にastro:content module not foundみたいなエラーを出す場合は、以下のコマンドを実行するか TS を再起動しましょう。
$ npx astro synctsconfig に strictNullChecks を追加する
null, undefinedに強く制限できるようになったため、追加することができます。
3 tsconfig に
strictNullChecksを追加する
Pages のルーティングにマッチさせる
contentに置かれたファイルを実際の Path にマッチさせるように変更していきます。今後は、以下の API を使い Content を操作します。
import { defineCollection, z, getCollection, getEntryBySlug,} from "astro:content";一覧ページ
---import type { GetStaticPathsOptions, Page } from "astro";import type { CollectionEntry } from "astro:content";import { getCollection } from "astro:content";import BlogCardItem from "../../components/BlogCardItem.astro";import Pagination from "../../components/Pagination.astro";import MainLayout from "../../layouts/MainLayout.astro";
type Props = { page: Page<CollectionEntry<"blog">>;};
export async function getStaticPaths({ paginate }: GetStaticPathsOptions) { // v1: return paginate(await Astro.glob("../pages/blog/*.mdx"), { pageSize: 20 }); return paginate(await getCollection("blog"), { pageSize: 20 });}
const { page } = Astro.props;---
<MainLayout title="Blog"> <div class="flex flex-col gap-4"> { // v1: page.data.map(({ url, frontmatter }) => ( page.data.map( ( { data, slug }, // v1: <BlogCardItem url={url} frontmatter={frontmatter} /> ) => <BlogCardItem url={`/blog/${slug}`} frontmatter={data} />, ) } </div> <Pagination prev={page.url.prev} next={page.url.next} /></MainLayout>上記のコードを見てわかるように、大きくは変わりませんでした。しかし、Collectionの中にurlが無くなったため、自分で URL を組み立てる必要があります。
公式でも/でつなげてますが、page.urlには固定した値がなく/blogを手に入れる方法がないからです。
4 一覧ページで型/
getCollectionに書き換える
Content ページの作成
---import type { CollectionEntry } from "astro:content";import { getCollection } from "astro:content";
type Props = { entry: CollectionEntry<"blog">;};
export async function getStaticPaths() { const blogEntries = await getCollection("blog");
return blogEntries.map((entry) => ({ params: { slug: entry.slug }, props: { entry }, }));}
const { entry } = Astro.props;const { Content } = await entry.render();---
<Content />今まで、pages に Content を置いていた時には、自動的に URL パスがそのファイル名になって特に何もする必要ありませんでしたが、src/contentに移動したことによりエントリーポイントを作成する必要があります。
引き続きlayoutの機能は利用できるので、上記のようにルーティングするだけのファイルにすることもできます。
なぜかこのファイルにドキュメント同様の<h1>{entry.data.title}</h1>を追加したら文字化けしたので、もしこれに遭遇した時はrenderで生成したもの以外は同じ階層に置かないほうが良いかもしれません。
5
[slug].astroを作成し、renderを利用する
手順まとめ
- 1
pagesにある Markdown/MDX をsrc/content/xxxへ移動させる - 2
config.tsを作成し、Markdown/MDX に使われている frontmatter を定義する - 3
tsconfigにstrictNullChecksを追加する - 4 一覧ページで型/
getCollectionに書き換える - 5
[slug].astroを作成し、renderを利用し実行する
案外、さっくり終わったので今ブログを構築している方は移行してみても良いかなと思います。
既存からの変更まとめ
- API:コンテンツファイル取得方法の変更
Astro.glob("../pages/blog/*.mdx")=>getCollection("blog")getEntryBySlug('blog', slug)でファイル単体の取得
- API:
CollectionEntryの追加MDXInstance<Frontmatter>=>CollectionEntry<"blog">
- API: frontmatter
- Type:
CollectionEntry<"blog">["data"]で型を取れるようになり、自前で定義する必要がなくなった entry.frontmatter=>entry.datafrontmatter.urlがなくなり、ひとつ上の階層にあるslugを使う必要がある
- Type:
- Performance: render-blocking-resources がアップデートで一つ増えた(-)